Monthly Archives: May 2013

“Vancouver Theatre Faces a Real Tragedy,” But You Can Do Something About It!

1.127

This issue is very near and dear to me as a performer and musician and theatre lover. The Centre in Vancouver for the Performing Arts is a wonderful theatre downtown for dance (The Goh Ballet), concerts, comedy shows, and the Vancouver Film Festival. But there are signs that this venue might be sold and become a evangelical mega church. I have seen many great shows there and it is an outstanding place to see performances – from the comfortable seating to the great sound system to the twice as many women’s than men’s washrooms! Before it happens though the city council would have to get involved. There is still a chance that we can speak up and change things. Below are links to articles to learn about the venue itself and what is happening with the centre; and links to ways to make your voice heard. The most simple way is to email – mayorandcouncil@vancouver.ca and tell them you want them to help stop this from happening. PLEASE SEND AN EMAIL!

Vancouver theatre faces a real tragedy by Marc Hume for the Globe and Mail

Church vies to take over Centre in Vancouver for Performing Arts by Janet Smith for The Georgia Straight

Please don’t close the Centre Facebook Page

Petition to Save the Centre

The next Vancouver City Council Meeting

This is  the venue: The Centre

#savethecentreforthearts

#SaveTheCentreForArts

*photo from http://www.centreinvancouver.com/

A Little, Non-Food, Show and Tell: My Favourite of my Paintings

I haven’t had a chance to paint much in the past month or so but I’m pretty proud of the work that I have done that hangs in my home, and in others as well.

This piece is the result of the final project of my most recent art class at Emily Carr, and my favourite of all my work. Our task was to do a little research and try our hand at painting a copy of a work of a master. I chose Marc Chagall. I found a decent digital picture I could download from the Metropolitan Museum’s website and printed it out ( the picture taped to my board on the upper right). I did my best to recreate the work (with acrylic on 18 x 20 canvas). It took about about 15 hours in all.  I am really proud of how I did:

IMG_0046

The small piece is a quick one-hour study of some fruit that my teacher brought into class.

Weekly Cooking Day and Blog Recipe Preview!

IMG_0011

Update – it has been a busy week so I’ll post a couple of the recipes today and then throughout the next few weeks – also coming soon: vegan caramels!

So here, in my life and home, cooking delicious healthy meals from scratch every single day just isn’t feasible. It isn’t feasible in most of yours either, I presume. What I can do and I love to do is to spend part of one day a week cooking yummy things to eat all week long.  I store everything in the fridge in giant containers and pull it out and warm it up. So easy. And I get to sit , maybe watch a movie (today Outsiders: The Complete Novel), get a few things organized, do some tai chi, read internet gossip and prep a few blog posts while I do the cooking.

On the menu for this week’s lunches and dinners:

  • grains:  brown basmati rice with garam masala spice, whole-wheat rotini pasta, seet potato dumplings
  • fish and poultry : roast duck, fajita-spiced chicken breasts, steamed tilapia loins
  • one bowl meal:  3 bean chili with rice
  • sauces and soups:  basic tomato marinara and butternut squash soup,  sweet potato soup and guacamole.
  • spice mixes – Italian, garam masala, fajita, and cajun

(Some are pictured above. Every recipe with the exception of the proteins section will be vegan friendly!!)

This kind of mass-cooking may sound daunting but it really isn’t. These are simple recipes that can be adjusted to use you what you have on hand. Personally, I don’t go out and do a giant grocery shop each time. I just use what I have on hand and get a little creative. But I have been cooking for my family and household for over 15 years now so I look in my fridge and see recipes; I am told this might not be the norm for everyone else.  If it isn’t the norm for you and you want to cook at home and have it taste as good as restaurant food but be much cheaper (and without any mystery ingredients) then keep an eye on the blog, do a little grocery list – I will post you will need sections right up front-  and get what you need. ( If requested I can do a post on stocking a pantry/fridge/freezer to make this sort of cooking as simple as possible.)  I’m sure some of you already have basic cooking skills and then it’s just a matter of sizing up the portions you make.  If you are a beginner cook then hopefully, this will be a good place to learn. I will do my best to be simple in the instructions and provide as many pictures as possible.

I will be posting the recipes in bold above on the blog this weekend and this coming week; Including recipes for the spice mixes I use to make my life in the kitchen even easier!

Oh and one last added benefit to this weekly cooking: fewer dishes to wash during the week! Squee!

Guten Appetit!!


Dark Chocolate Pasta with White Chocolate Sauce (Vegan-friendly)

IMG_0065[1]

This was my dessert tonight. Mmmm, weekly dessert deliciousness……. There is powdered sugar and a little cinnamon and chocolate sprinkles on there too. And, yes, it’s vegan.

I know there are those of you who at first glance will not find this appealing but it is so freaking good. You should try it.  It is sweet and rich and fun to eat too!

The pasta was bought in Seattle but I think you could find something similar in ( insert your large city here). Or if you know how to make pasta there are many recipes out there -PS  we need to become good friends 🙂 .  The vegan white chocolate is actually a German product – labelled Weisse Schakalode (strange spelling) – that comes in buttons for easy melting. I found it at one of my favourite stores in the Vancouver area – Karmavore in New Westminster  They also have the most amazing vegan peanut butter cups, macaroons and SOFT SERVE ICE CREAM! So if you, like me, like dessert but can’t do dairy and eggs then try them – and Edible Flours on West Broadway!

But I digress, the sauce is melted (vegan) white chocolate with a touch of almond milk. I think it would be amazing with a dollop of ice cream (Coconut based for me!). This could also be done non-vegan, with milk chocolate etc.

For those of you who can only cook pasta: This is a dessert to impress your friends. Or just yourself.

Photo 21.05.13 19 33 45

Bread Baking 3: Baking the Bread!

IMG_0053

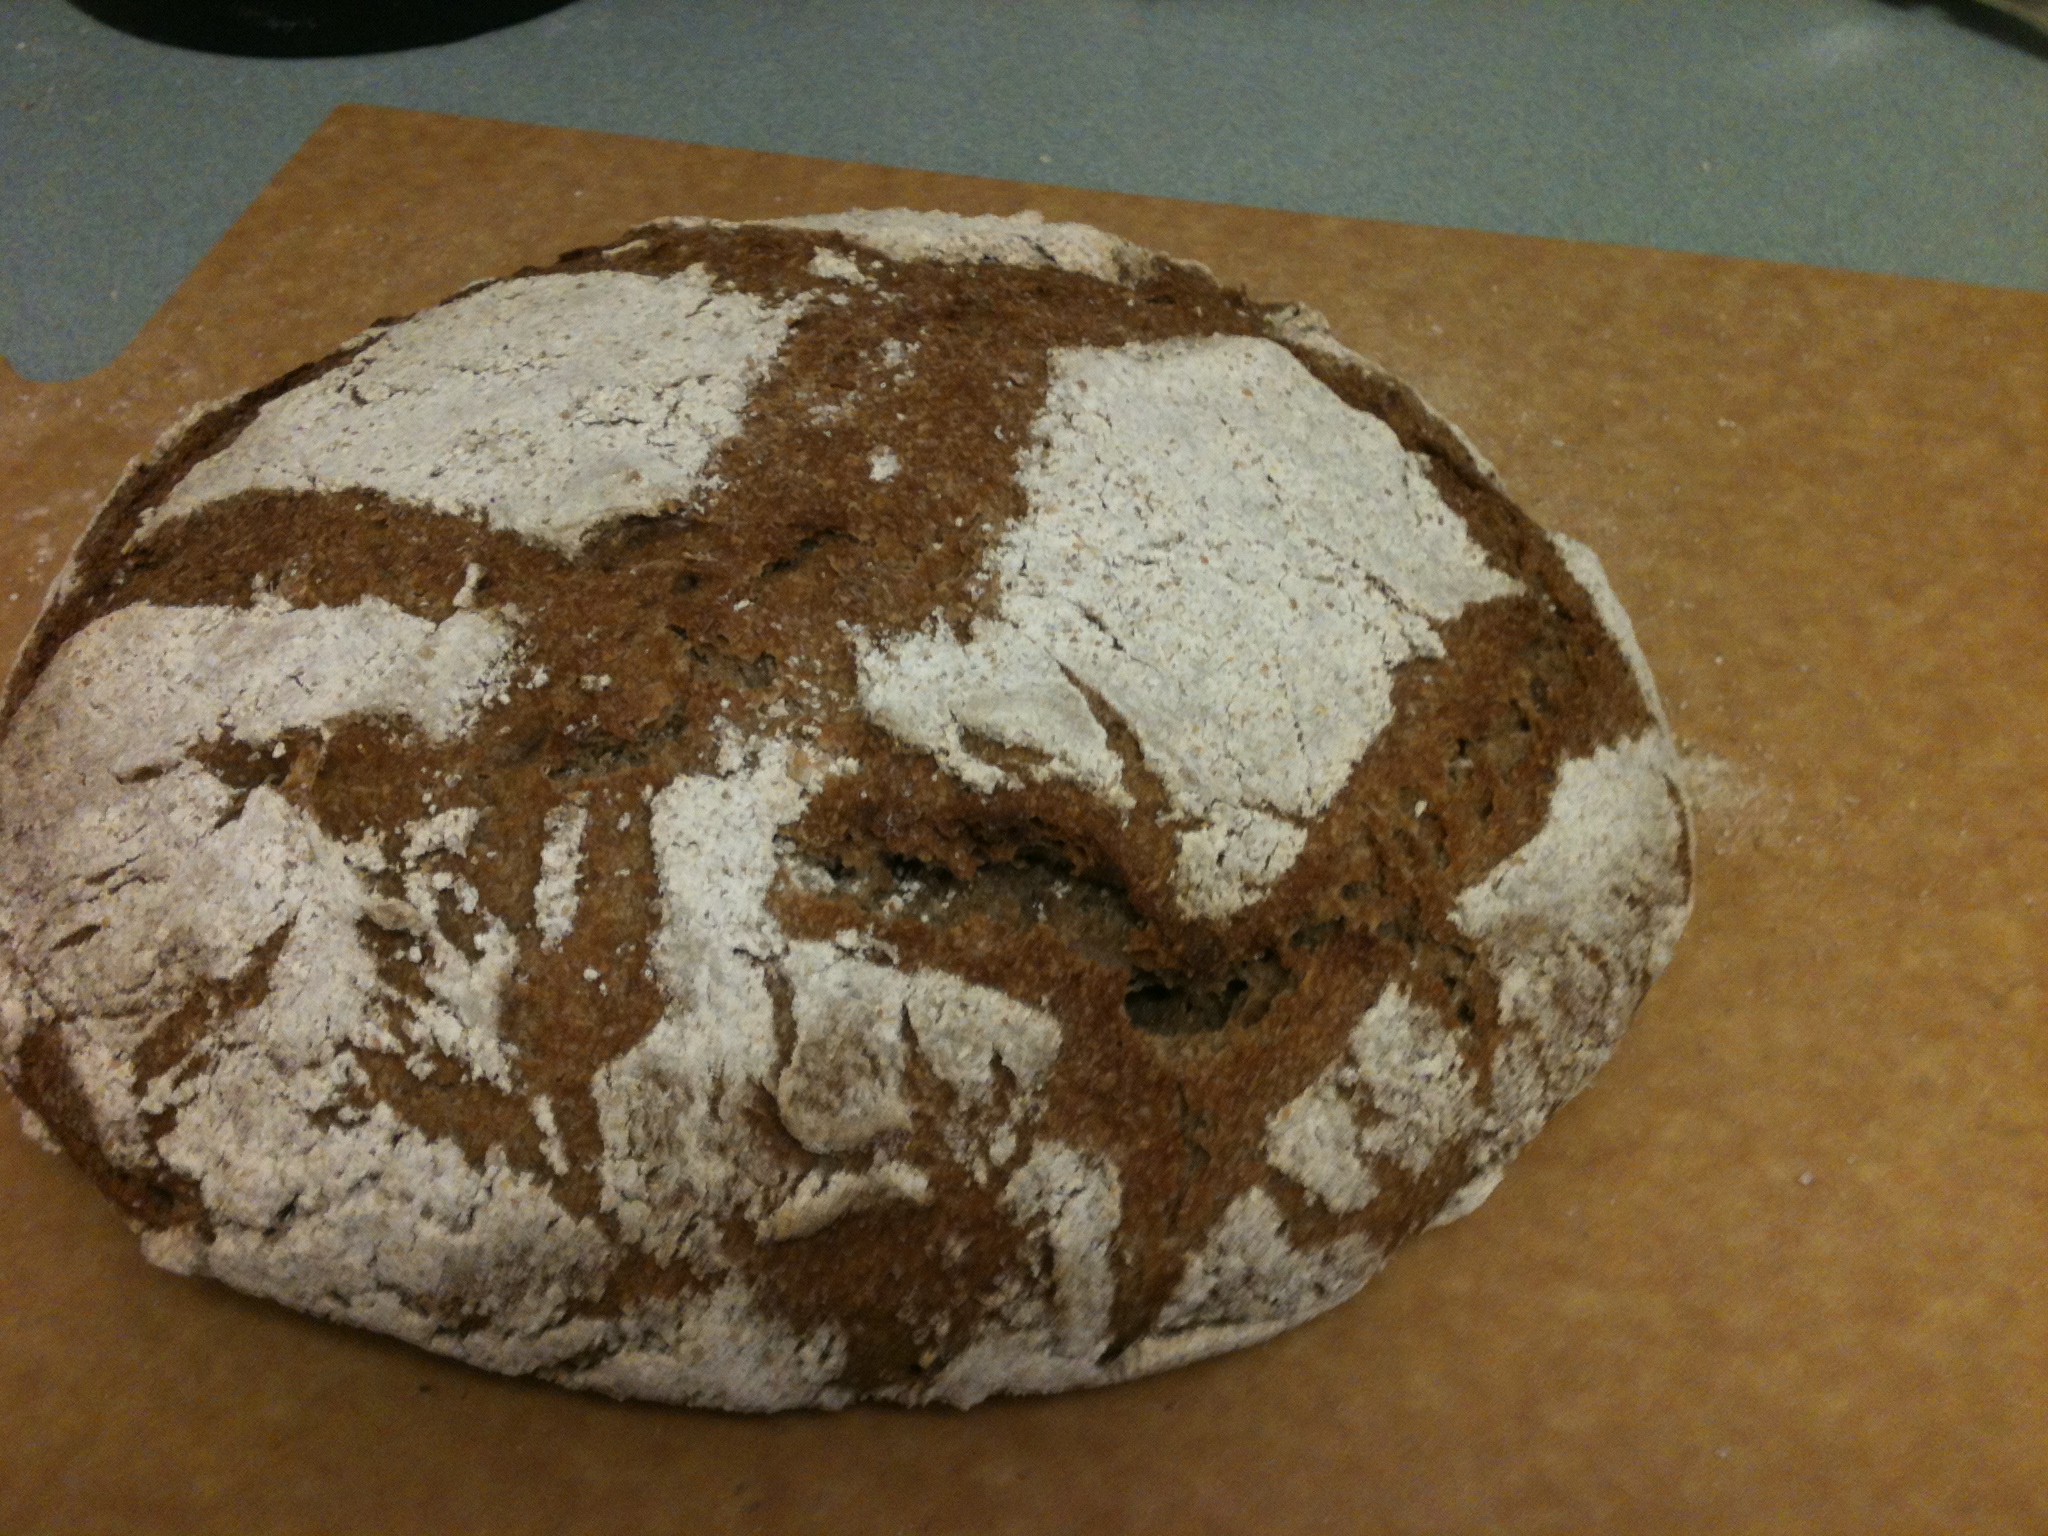
So your bread dough is risen and already looks delicious.  Now it is time to bake!

[If it doesn’t have this even crackle to it – try leaving it longer to rise. If you leave it a while and it still isn’t very crackly or there are just a few large cracks then next time try stirring and manipulating it less. Too much water or a not fully developed starter ( the bread will get better and better the longer you have and feed the starter)  can also contribute to a less appealing result. Whatever it looks like – BAKE IT.  Odds are it will taste good, even if it might not look perfect.]

Check your oven rack(s). One should be in the centre position. If you have more than one rack put the second on the lowest level.  Heat the oven to at least 450 F.

Traditional bread, like this, is often baked in fire ovens – so hotter is better. The key is to get to know your oven. Gas ovens often run hotter than electric ovens. I have an electric oven so I try to get mine pre-heated as hot as possible (setting it at 475 F).

If you are concerned about your bakeware or burning the bread then just don’t preheat the oven quite so high – bake at a lower temperature for longer – my first time with this bread I baked one loaf for 50 minutes at 425 F. But I use the higher temperature consistently now because the results are better.

Take out your baking pans.  I often use 8 x 8 inch cake pans, and cookie sheets. This last time I also tried a deep, glass, pie pan with a lid.  Corning ware might also work. Apparently Dutch ovens are great for bread baking but I don’t have one.  And I get such good results with a different technique that I don’t intend to invest in one any time soon.   If you only have one pan or two and you are making more then one or two loaves just reuse the pans. I suggest putting no more than 2 loaves in a regular-size or apartment size oven. I do two bakes for 4 loaves. I have also done 2 bakes for 2 loaves.

I line my metal pans with parchment paper.  It is a really good investment if you bake even a few times a year and is outstanding for a beginning baker. It makes sure your bread ( or other baked good) doesn’t stick to the pan, and has the added bonus of preventing the bottom of your bread from getting too dark (always a problem with dark non-stick pans). It also has the added benefit of preserving your pans from getting stained and icky and makes clean up  a breeze.  I resisted getting it for a long time – do it! – it’s totally worth it.  

Now flip your bread out of the “bannetons” into your hand and peel off the tea towel. (If it sticks a bit, patch it up and spread a bit of the flour from the rest of the loaf over it. And next time use more flour on your cotton cloth.) Place the bread onto/into your baking pan – crackly side up.  🙂   You’ll notice the surface of the bread it quite dry which means yummy, chewy crust!

For the best crust results  you need steam! This is a very simple thing to create or capture. The original recipe suggests covering the bread for the first half of the baking time. I tried using a lid on one loaf but forgot to take it off during baking  – If I do it right next time I’ll update you on my results compared with my usual technique: taking an extra oven safe pan (I use a loaf pan as my baking sheets tend to warp), placing it on the bottom rack and letting it get very hot and pouring cold water onto it right after I slide my bread in.  I have also taken a cold pan  and placed it in the oven and added boiling water from a kettle. The goal is having a steamy oven to bake your bread in. If you only have one rack just put the container you are pouring water in on the same rack as the bread.  Experiment and find a way that works for you and your oven: Go to it sir! and share please!

So place your bread in the oven, create some steam and close the door. And try not to open it again for a long while.  At this point I turn down my oven to 450 F and let it bake for about 35- 40 minutes.

The first couple of times I baked this bread I found it incredibly difficult to know exactly when the bread is perfectly done. I knew I should see that the cracks in the loaves were dry and  the edges of those cracks should have turned golden brown. But through the glass window in my oven it is very hard to see this; especially as the loaf is dark in colour to begin with.  So I did some research online and found out that the internal temperature of the loaf should be 200 – 205 F. So, when baking, I put my trusty meat thermometer to use.  Though my model only goes up to 194 F,  if I leave the bread in the oven for 3-5 minutes after it reaches 194 F  then I know I’m set.  I usually pop the thermometer in one loaf at the 30 minute mark. At this time, I often rotate my loaves as my oven is small and it is always hotter towards the outside edges.  Measuring internal temperature like this can give you confidence that it is completely finished baking and will be fully cooked inside as well as outside. If you don’t have a thermometer then looking for the dry cracks and browning on the bottom and at the edge of the cracks works. There is the knocking technique as well – If your bread is done you can knock on it and if it sounds hollow it is done ( please try not to burn yourself!).  If you have to open the oven often in the last 10 minutes or so then do it.  It will extend your baking time but it is a good way to learn.  Another way I judge “doneness” is by smell; my whole house gets that wonderful bread-baking smell about 5-10 minutes before I need to take it out of the oven.

This is the result :IMG_0061

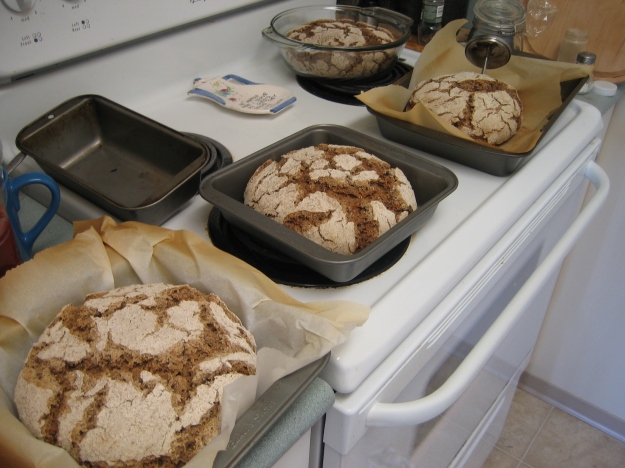
This time I tried a glass pan, and a no parchment pan, and all the loaves turned out wonderfully.  So use whatever you have on hand that is oven safe to about 475 F. (You can also spot my thermometer.)

Take the loaves out of the pans right away ( or right after you take a picture 🙂 )  And place on rack of some sort. I use the rack that came with my roasting pan – I have also used wok racks and such. Find a way for cool air to circulate around the bread, and prevent condensation so you don’t end up with soggy bottoms. Before I had a rack I used rows of leftover, take-out chopsticks on my counter and flipped my bread often.  I think the key to baking is to find what works for you in your kitchen. People everywhere for centuries have been baking bread and all sorts of other yummy treats in all sort of different environments and kitchens with a range of tools. I guarantee you that you don’t have to buy fancy gourmet items and tools to get great results. And you don’t need to follow the recipe exactly every time – or even the first time. Small adjustments and creativity can get you the best and most satisfying results.

Speaking of results:

IMG_0055

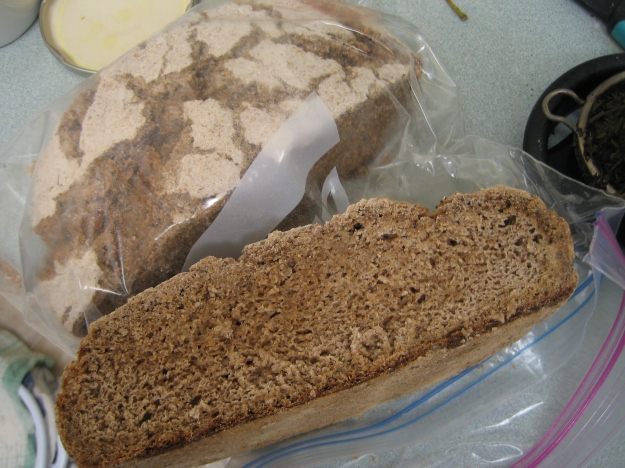
This 100% dark rye bread is heavy and healthy and incredibly yummy! I suggest baking as much as you can handle and fit in your freezer. The loaf will last on the counter for days and freezes incredibly well. Just take it out a few hours before you want to eat it. I suggest a good serrated knife for cutting.

ENJOY!!

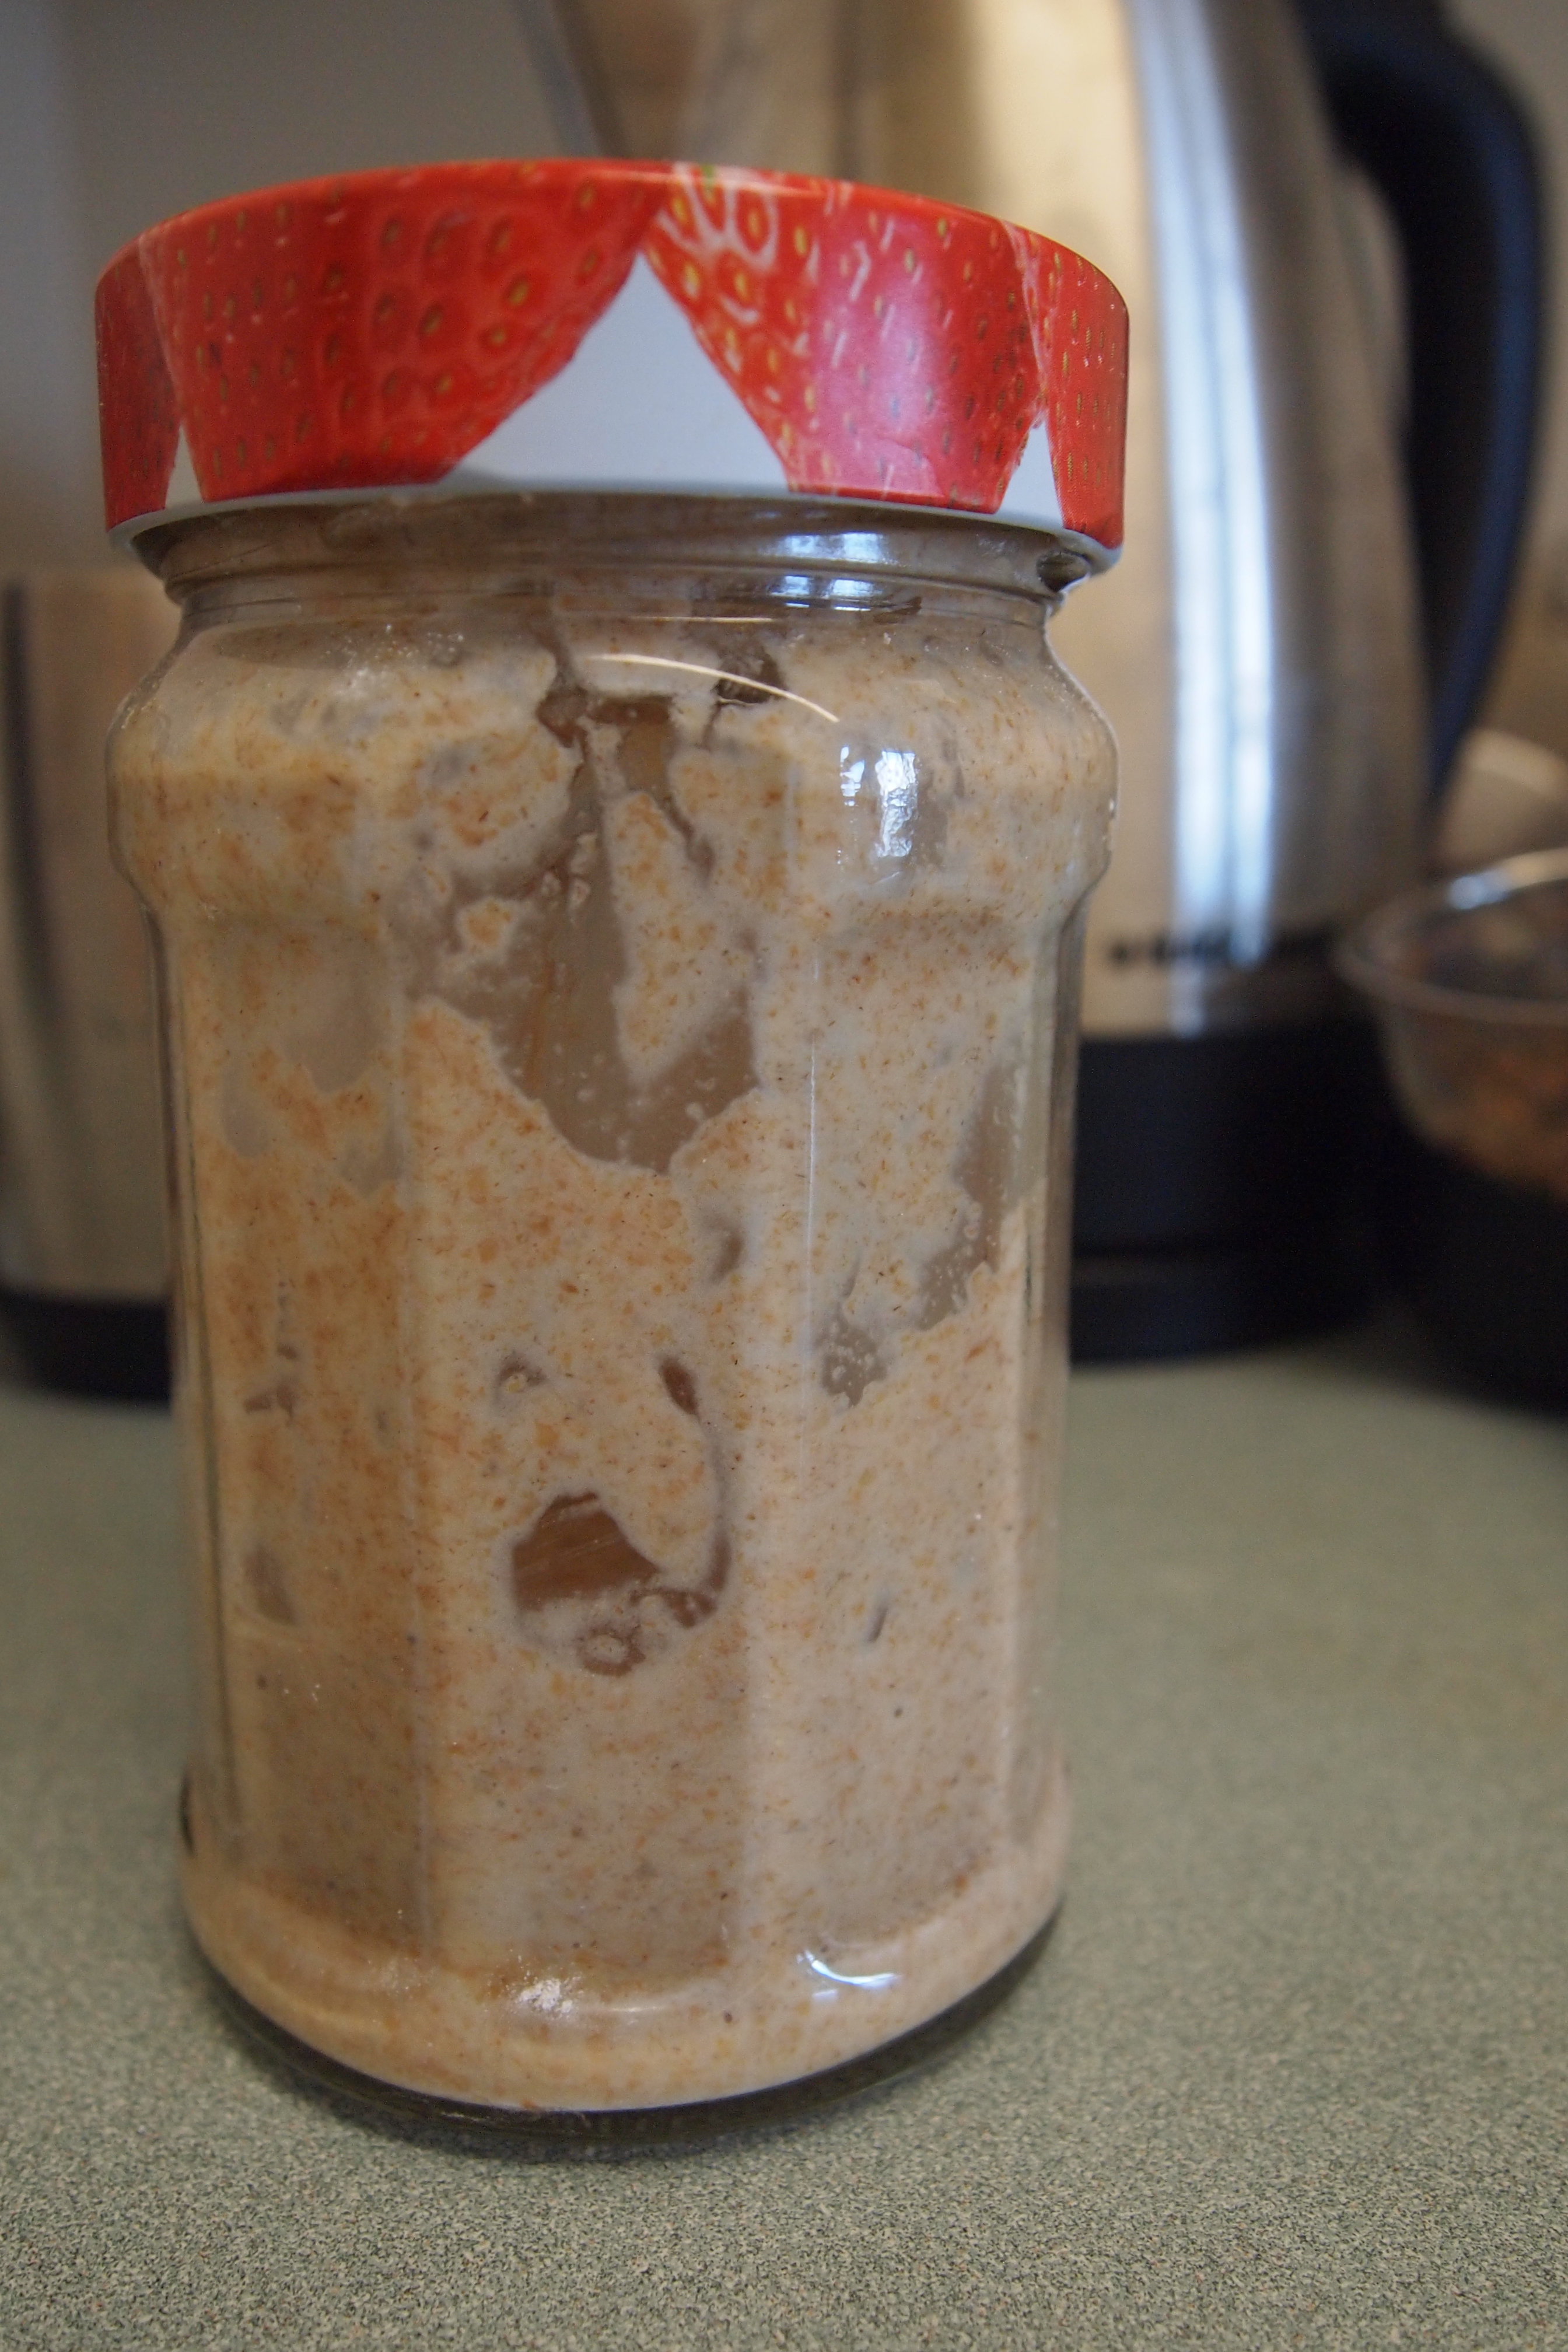
(As for the starter you can continue to feed it every 24 hours, or even 12 hours, or you can refrigerate it until a few days before you want to bake again – revive it by taking out half and adding flour and water. It will spring right back to life!)

Bread Baking 2: Mix, Form and Rest

OLYMPUS DIGITAL CAMERA

So last time I had four starters going and was ready to wait.  And I did wait – approximately 10 hours.  The exact period of time is something each baker needs to figure out based on the development of the starter and whether or not it is convenient timing life-wise.  If you are using a clear glass bowl/jar you will see many consistent bubbles appearing in the starter. In my research, I have seen that the best time to start your mixing is when the starter is at it’s full height (at some point your starter will double and then fall a little).  This is something you can try to figure out on your own.  You can mark your jar with a felt pen and watch check it every half hour etc. But I am not that type of baker. I leave it for hours and hours – this last time I forgot completely that my starters were waiting until I headed to the kitchen to get a glass of water at bed time. Whoops.  This can be an exact science, or it can also be something you improvise.  And both methods can yield very good results.

OLYMPUS DIGITAL CAMERA

At this point you will need to set up the DIY bannetons. Bannetons are bread proofing baskets.  For this type of bread you want a thick lovely crust and for that you need to let your bread rise in a container that will let the outside surface of the dough dry out. There are professional ridged bannetons that you can purchase at gourmet stores and online sources. I have also read that lined wicker baskets are a common proofing container.  But I get great results with the colander I got a a the dollar store I keep around the house (in a pinch the interior basket of a salad spinner is great too.)  I line the inside with a clean cotton tea towel/ cloth (washed. no fabric softener. Food will be in direct contact with the cloth.) and then generously flour the towel/cloth with the same dark rye flour used for the bread. ( I tried AP flour once but I didn’t get good results). This is my “banneton”:

OLYMPUS DIGITAL CAMERA

Now you will need measurements for the dough:

For EACH loaf – (finished loaf about 1kg): 

  • prepared starter from Yeast Breeding day! post (about 250 g)
  • 500G of Dark Rye flour ( I use Rogers)  ( or if you prefer a mix of rye and “white” flour  good mixes  I’ve used range between 350g Dark Rye and 150g All Purpose and 425g Dark Rye and 75g AP)  – if your white flour isn’t from a Canadian source – use bread flour.
  • about 1.5 teaspoons of sea salt
  • 2 tsp of caraway seed (to taste – or leave out completely)
  •  1 1/3 – 1/2  cups of water – I generally measure about 365g on my scale. A good amount of water for best result for your type of flour and mix can vary.

These is proportions are adapted from online recipe sources – primarily Root Simple –  if you are so inclined you can experiment with adding milk and fats, nuts and oats etc- but I keep going back to the plain simple loaf.

[I did not include typical cup measurements for the flour – because flour measurements by cup can vary so greatly and really affect your baking – if your flour is pack or sifted or wheat etc. and if you are mixing flours to find the taste you want then the cup amounts can vary greatly  – if you are desperate for an estimate it is around 4 cups I believe. I weigh the flour because I get better more consistent results when I do.  I am big on experimenting with recipes though so have at it in whatever way works best for you. ]

OLYMPUS DIGITAL CAMERA

Measure ingredients and pour into bowl. (This is 100% rye flour)

Stir ingredients in bowl with a spoon (I use a wooden spoon) until just combined.

OLYMPUS DIGITAL CAMERA

At this point you can definitely let the dough rest for a half hour or you can just plop the  stirred lump of dough onto a clean, rye-flour covered surface: OLYMPUS DIGITAL CAMERA

Now cover your hands with flour- it is a sticky dough. Then use your hands to form it into a flattened ball shape. Manipulate the dough as little as possible.  NO KNEADING! Be lazy! The results are so much better if you handle the dough as little as possible.

OLYMPUS DIGITAL CAMERA

and generously, completely cover it in the rye flour:

OLYMPUS DIGITAL CAMERA

Then place it into the prepared “banneton”

OLYMPUS DIGITAL CAMERA

Then leave it alone.  I formed my four loaves and place them in a warm, dark place then went to bed.

10pm Friday:

OLYMPUS DIGITAL CAMERA

8am Saturday:  SO GOOD!!!  This was an outstanding result. The more “crackling” the better.

IMG_0056

You’ll noticed my loaves differ in colour.  The loaves on the left are 100% Dark Rye Flour. The ones on the right are a ratio of 350g dark rye and 150g AP flour.

Next post: Baking the Bread!

Bread Baking 1: Yeast Breeding Day!

IMG_0161

I’m not particularly in the kitchen project starting/baking mood today but we have run out of bread.  And as I revived my starter a few days ago and it’s  all ready to go, and  I can make an extra loaf for my mother and etc etc. I have spent the morning reasoning / “guilting”  myself into bread making this weekend.

I don’t love baking bread  as a regular obligation, but it is a baking project filled with a lot of personal satisfaction: “Woo! I made bread! Bread that I can eat!”   It also makes those I share it with very happy. And if you are so inclined you can go on social media and brag. Or the next time you go to a restaurant and your friends exclaim, “Mmmm fresh bread!”  You can reply smugly, “Yes it’s fine but the one I bake at home is sooo much better!” or “I’ve started making my own bread at home -from scratch- so I have this all the time.” and enjoy the resulting eye roll.

The bread I work with is very simple.  It’s a traditional German Rye Bread  – a whole grain sourdough with a thick chewy crust. It has only 3 main ingredients:  Flour, salt, water. I love added caraway seeds so I add them. No sugar.  No dairy. No eggs. Vegan friendly ( as long as they don’t count eating yeast as a problem ;).  Most importantly: NO KNEADING.  You stir and form it and then leave it alone over night or all day and then stick in the oven. It’s a low maintenance loaf. But looks brilliant  when finished.

IMG_0167

I am making 4 loaves this time 1 to eat and 2 to freeze and one to give away.

What I need for 4 loaves:

Non-food supplies:

  • a leftover glass jar with lid ( about 250ml in volume)
  • 1 large glass bowl (no metal) or 4 bowls for convenience
  • 4 dollar store plastic colanders ( or professional boules or untreated plain wicker baskets or seriously just the colander you use to drain pasta)
  • 4 clean cotton tea towels ( no fabric softener etc)  (Ikea ones work beautifully)
  • a wooden spoon
  • clean counter space or large cutting board
  • an oven
  • 2 or more baking sheets/cookie sheets or two dutch ovens
  • 2 minutes every night for a week ( for the first loaf less later)    then a 24 hour period  that has a few hours free every 10 hours to do a few minutes of work

Food supplies:

  • 2.5 kg of Dark Rye flour (I use Rogers)
  • Water  (I use Vancouver tap water)
  • 20-40 grams of sea salt
  • 2-3  tablespoons of Caraway seed (optional)

Optional:  a few cups of all-purpose flour (Canadian)  or specifically labeled bread flour if not Canadian

Rye Bread Step One:

For this bread, a sourdough,  the process of baking begins with a starter- the one I referenced earlier. For new and seasoned bakers alike this may be a first adventure into the breeding of yeast! Do not be afraid! Yeast is a friendly funghi!  (I will spare you the writing of the pun). Generations tracing back to the ancient Egyptians did this. And yeast you breed yourself has a distinct flavour that you just don’t get with commercial yeast. Plus it is fun to watch grow. oooooo bubbles!

A simple rye starter begins with an empty glass jar – I use a leftover jam jar – and a tablespoon of rye flour and a tablespoon of water. So go get those things.  Dark rye flour is available at Safeway, or your local health/natural food/ bulk grain store. Get it as fresh as possible ( check expiry dates) and only buy what you need for a month or so – you don’t want old bad rye – it can lead to mania and bouts of witch burning (google ergot and Salem)    And then watch this beautiful video:

http://www.rootsimple.com/2012/11/new-root-simple-video-how-to-make-a-sourdough-starter/

This video is genius – I followed it exactly and got a wonderful result.   I know many internet sites will tell you to be careful of the water and be fancy about it but really it’s not necessary.  I live in Vancouver- the water is fine.  I find I get the best results if the water is room temperature or lukewarm – because yeast loves warm.  Which will give you an idea of the best place to store your starter – it likes warm and shady places – I keep mine on top of the fridge ( my kitchen is windowless).

This is what mine looks like right after I feed it (take out half and add new four and water):

OLYMPUS DIGITAL CAMERAOLYMPUS DIGITAL CAMERA

a few hours later bubbles!  and smells sour/alcohol/fruity. this is a healthy starter

OLYMPUS DIGITAL CAMERA

You can use the starter after 7 days. It should grow to almost double in size within 8 hours of feeding.  If you are impatient then ask  someone you know if they have a starter around. Seriously it surprised me when I posted on FB that I just made a starter how many people congratulated me and said they had one too.

Now to the days before baking:  I increase the amount of starter so that I have one tablespoon per loaf and one left over in the jar.  So for me that is 5 tablespoons.  I added 2 tablespoons to my starter a few days ago, then three etc.   Also make a note of how much flour I have as well as other ingredients. This bread takes a surprising amount of flour- 625 g per loaf. I have started making my bread 100% rye.   But if you run out of rye or you want a lighter flavour you can use a portion of of all-purpose/bread flour or so for each loaf.

So now you have 5 tablespoons of starter and everything else you will need so  here is the  night before / day before process-

Take one tablespoon of starter and put it into a glass bowl  – I use the large bowl will stir the full loaf in –  add  ½ cup of water and a little less than 1 cup of rye flour ( or if you have a scale 125g of each water and rye flour) Stir, and cover with a lid or plastic wrap and leave overnight  (8-10 hours is fine). This gives time for the yeast to eat and multiply.   This is where the 24 hour time period comes into play – started my 4 bowls of starter this morning ( you can use one big bowl and mix the whole amount if you prefer)- I will stir and form in 10 hours and then I will bake in the morning.  You can also make the larger starter the night before, form loaves in the morning and bake in the evening.

These are mine:

OLYMPUS DIGITAL CAMERA OLYMPUS DIGITAL CAMERA

Tomorrow Part 2: Forming and Baking